Saturday, December 29, 2012

GETTING HITCHED.........

It's not what you are thinking.
I have been pondering this for a long while.  I need a way to add a receiver hitch to a 35-40 Ford frame.  It needs to be an integral part of the frame. 
 Something that is not an after thought.  Something that will work for pulling my vintage travel trailer or hooking on to my vintage drag car and not worrying if it will fail 180 miles from the nearest gas station.
The weak link in any 35-40 Ford frame is the rear c channel that finishes out the frame.  They are almost always tweaked or in this case, missing.  They are made out of a light weight sheet metal and usually don't weather the abuse seen by a lot of farm trucks.
I decided to sketch it out on paper first.  It saves money in the long run.  
The first thing I needed was tubing.  In order to help beef up the rear area, I decided to use a thick walled tubing to replace the original C channel.  I stopped by a local metal supplier and picked up a 4 ft. stick of 2"x 2"x1/4" wall. 
 I figured to minimize the driving back and forth, I would go ahead and get the receiver tubing as well.  Be ready to take it in the shorts when you buy that.  It is "special" tubing with no welds, made specifically for receiver hitches, therefore you pay for that.  It was $20 per foot.  Ouch.  So I opted for 2 feet.

I scrounged up a piece of 1/4" plate that I used to plate the lower area of the original crossmember.  This plate was approx. 10"x5".
I picked up the original holes that used to hold the leaf spring pack in place.  I drilled the plate to accept 1/2" bolts.  This will serve as the base for the receiver tube.
After I talked with my buddy after mocking everything up , we decided this would look better if it were cut on a 45 degree angle and then capped to look finished.  This will eventually be welded to the plate that is bolted to the crossmember.
Capped and finished.
 Once I found the centerline on the frame, I clamped the receiver tube in place and then tacked in place.  I then pulled it off and welded it on all four sides.

This is what it looks like with the rear crossmember temporarily installed.  The gap between the receiver tube and rear crossmember is going to have to be addressed. It is approx. 1.80"
 I figured I would build a gusset that would tie all the pieces together.  The hard part is not getting out of sequence.  In order to make it all go together correctly, I have to pay close attention to the order it gets welded up.  One thing out of sequence and I am screwed.
Here's a crude drawing of the gusset I am thinking of building.
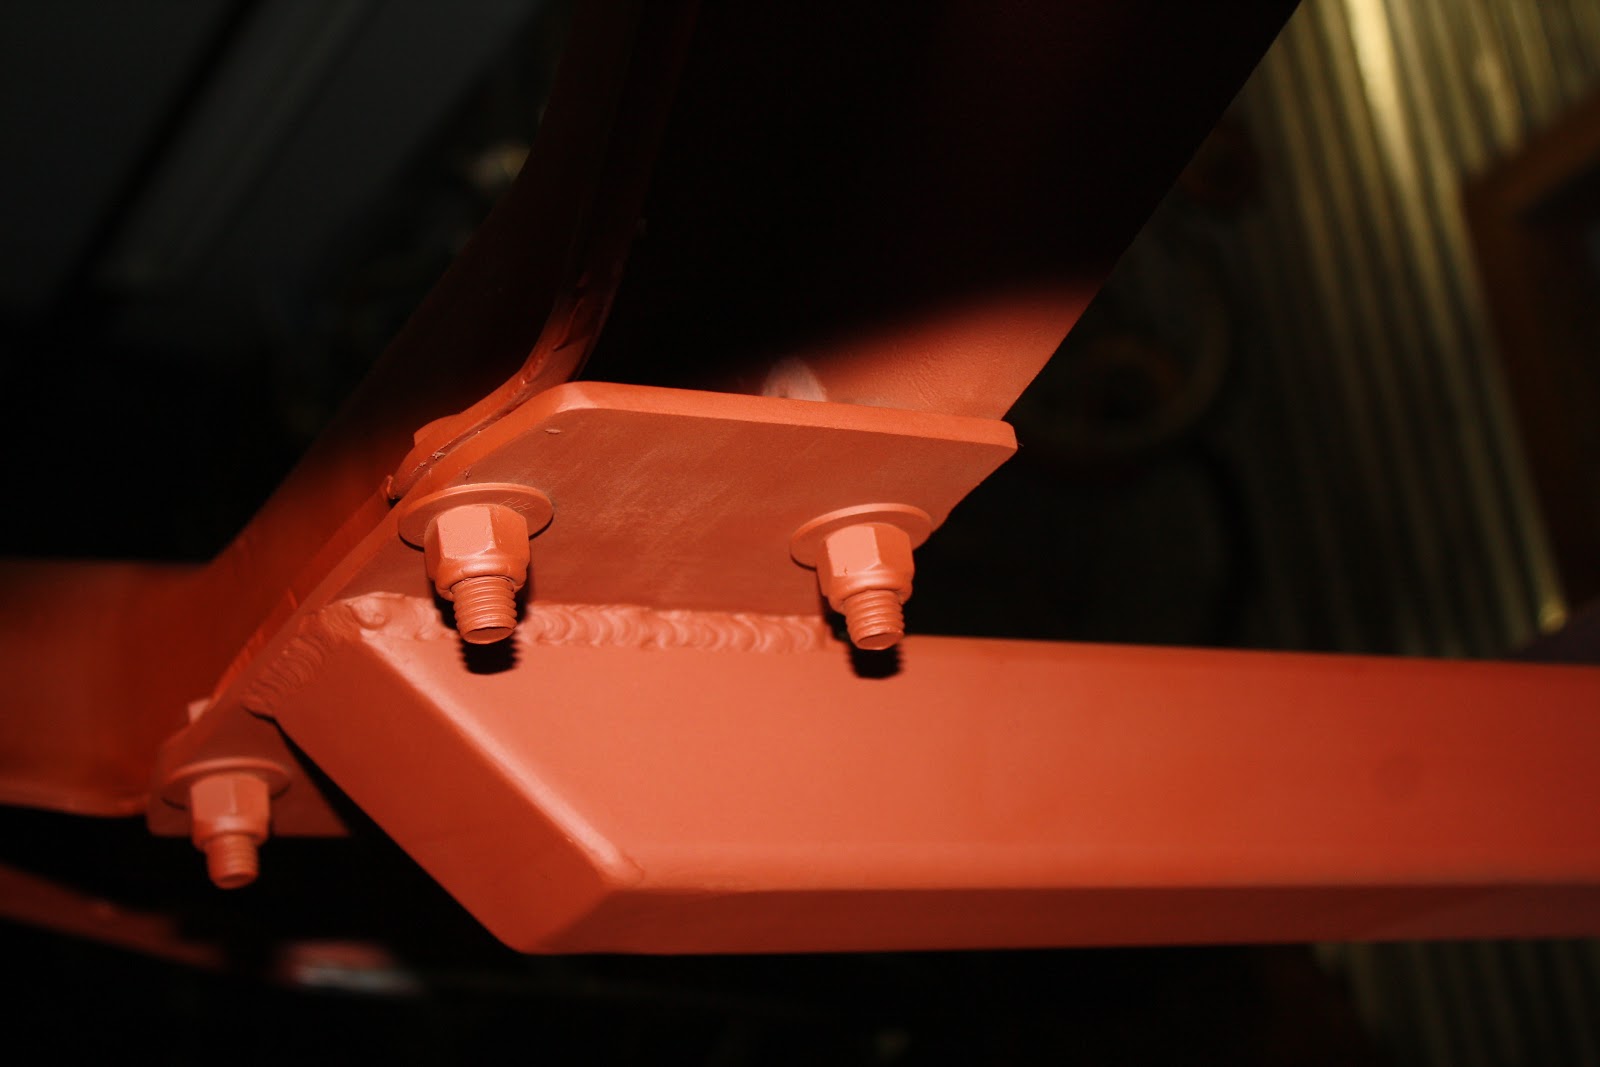
Here are a few shots of the receiver tube, once it was welded and bolted back into place.

The 45 degree angle will help as a possum scraper.

The plates mounted to the ends of the rear cross member were fabricated out of 1/4" plate.  One of the built in safeties, is the fact that the frame is tapered and that prevents the cross member from sliding out.  This is a double edged sword.  It also prevents you from removing the cross member and building it on the bench. 

 The plan is to weld one side completely, then reinstall into the frame.  I left enough space when fitting the end plates, to allow the assembly to be pulled aft far enough to weld the remaining seams. This will then be bolted through the original frame rails. The problem with doing it this way, is that you lose the ability to run a rear bumper.  I was planning on running nerf bars anyway.
I fabbed the gusset out of 1/2" plate.  I know it's overkill, but I had a piece that was the right size, so overkill it is.  It's welded on both sides, so it's not going anywhere.
Sorry, I got rolling today and the pictures didn't happen.  I opted not to use the holes in the gusset, since this will be covered with a roll pan.  I'll have to fab some sort of safety chain attach points.  I'll do that after I have the roll pan installed.
I decided to clamp the frame rails down and weld the tabs to the cross member.  It's really not necessary, but it tidies things up a bit.

All that is really left is to drill the side plates and prime everything.  I know the question will come up about the fuel tank.  This clears the tank by over an inch, so that shouldn't be an issue.  

Actually, this sort of protects the tank a little more, in case some cell phone, texting, soccer mom in her H3 plows into the rear of me.  Think Ford Pinto.
All in all, this thing is probably the strongest part of the frame.  It's overkill, but I think it should be sufficient.

Friday, December 28, 2012

Hot Rod Heroes part 1

I would like to take time, to recognize people that are what I consider to be essential in the hot rodding world.  Real people with real hot rods.  These guys generally go un-noticed, they are quietly building hot rods in their garages, away from the reality TV crews and the magazine coverage.  They don't have CNC mills and lathes   in their shops, just basic stuff and a desire to build.

My first Hot Rod Hero hails from South Carolina.  His name is Jeff  Yocum or "Flamedabone" on the HAMB.  I first met Jeff on the HAMB in around 1999.  He was a hot rod guy through and through.  He had a  passion for Pontiac powered daily drivers and who can't love that?

  The memory that I have of Jeff, that is forever burned into my memory,  is the very first time I met Jeff.  I pulled into the parking lot of the host hotel on the very first HAMB drags.  Jeff was on the 3rd floor balcony screaming  "ROOTHAWG!!!!!!!!" with arms waving in the air, trying not to spill his beer bottle.  He drove his Poncho powered A sedan all the way from South Carolina, roughly 1,000 miles, to race at the hamb drags, and then drive home.  That in itself, takes some cahones.
Jeff uses this A as his daily driver.  Complete with full cage and no windows.  Jeff has a knack for building cool stuff.  Here are a  few examples of his cars.


Every now and then I get a little bummed at the state of the hobby,  with all of the keyboard heroes, but I think about guys like Jeff that press on, no matter what is cool or trendy at the time.  They just build hot rods, plain and simple.  
That gives me hope.


Monday, December 17, 2012

REFLECTIONS.......REFOCUS

Most of my blog entries are generally pretty dumb and some even have a lame attempt at crude humor.  This one is not that way.

  I have been thinking a lot lately, mainly due to the fact that I lost one of my long time hot rod buddies.  We always assumed that we would have forever to build our hot rods.  That proved to be not the case for Dave. 

 Dave and I met over 12 years ago at work.  He was a new guy and everyone told me he had a 1957 Cadillac Eldorado Seville.  I had to meet this guy.  Dave had the weirdest sense of humor, it was just like mine.  Instantly we bonded and became friends.
 About a year ago, Dave was diagnosed with brain cancer, it was a blow, but he remained positive.  The treatments seemed to be working and everyone was optimistic.  Eventually, he weakened and the cancer got the best of him.  That really devastated my family.  It's rare that you find a friend that your wife, kids, extended family love as much as you do.
My buddy Dave, rest in peace, my friend.
  So why post all of this on your blog?  The main reason is, I started taking inventory on my life.... my priorities.  What is the purpose of this hot rod fetish I am so passionate about?  How many projects do I really need?  Why do I hoard this stuff?  I have been collecting it for decades.  What will my wife do with all of it if something happened to me?

I live on a main highway and every Saturday I watch 25-50 motorcycle guys leave out while I slave away in the shop, banging on old rusty metal.  About 12 hours later they all return, while I am still in the shop working on the same old rusty heaps.  This happens every weekend, year after year.

  The point is, they are out having fun and spending time with their family and friends while I am stuck building stuff with the intention that this stuff that is to bring me happiness someday.  You see, that day may never come.  I get so wrapped up in the details of the build, that they string out for years and years.   They have the right idea.  That's the way ht rods used to be.  Intentional and built with driving in mind. 

I started selling off things. I don't need all this stuff. I need to re-focus.  

This shop truck build is going to be different.  It's going to be functional and drivable and it won't take years to complete.  It's going to  be built in under a year. I may have to overlook some imperfections, but if so......who cares?


  It's all about the cruise.
Adios Amigo.

Sunday, December 16, 2012

4 Generations- The Tribute Truck

I always get a kick out of the next build. My wife thinks I like that more than the finished product.  She may be right.  I get bored when they are finished and usually sell them off and start over.
35's and 36's hold a special place with me.  They are engrained in my history.  They span 3 generations so far.  Eventually, my son will end up with one to pass on the legacy.
A picture of me on my second birthday, 1970, my pickup is in the background.  That was my present.  Mom thought Dad was crazy.
This build kinda holds a special place for me.  The frame is from my Grandpa's farm.  He had it laying up against the back of the garage for years and years.  My Grandpa grew up in an era long before political correctness ever reared it's ugly head.  A man's word was as good as it got and a handshake would finish the deal. 
 He passed away last year at the ripe old age of 99. 
4 Generations of LeGrange men.
 He ran a produce company during the years of the great depression.  He bought a 1936 Ford pickup for his delivery truck.  He drove from the far corners of the state delivering produce, poultry and eggs to grocers everywhere.  It was a novel concept started by his dad.  He told me you would buy the produce and just double the price.  What you didn't sell, you would eat.  Simple.

  This was way before big chain grocery stores came about.  
The old produce truck belongs to my dad now.  He logged over a million miles on the truck, before bestowing it to my dad. 

My dad started driving it on the street in 1956.  Around 1961, he quit driving it on the street and turned it into a C/Gas drag car with a Hilborn Injected 265 Chevrolet.  

Dad raced the truck up until 1976 at which time, it was retired.  I watched it lay in the back yard and deteriorate in the weather, as Mom and Dad paid for college etc.  I hated to watch it, but life gets in the way.  Fast forward to 2000, Dad decided to put the old truck back on the street.

So, what does this all have to do with the shop truck?

  Well, recently my dad was cleaning out my grandpa's house and found an old calendar.  It was a LeGrange Produce calendar from 1932.  It has the phone number, address, etc.  I thought it would only be fitting to build a "Tribute Truck" and include all of this information on some door art.  You see, the lettering will also include the proprietor "C.E. LeGrange", which just happens to be my initials as well.  Cool, huh?

Saturday, December 15, 2012

This and That....little things that add up

I have a few things that I need to deal with in order to keep moving forward with the frame build.  My goal is to do a couple of things every time I go to the shop.  I need to get the chassis sitting on all fours before winter, sub zero temps set in.

There is a couple of areas that need to be repaired and I figured I would tackle them next.  The first one is the area where the cab hangs down over the outboard sides of the frame.  Dirt always gets trapped in this area, causing the frame to rust and pit severely.  This is the case with my frame.  In some read it was pitted completely through the metal. This is almost exactly in the middle of the frame, so it is  critical that it is structurally sound.
I picked up some drops from a local steel supplier, which are cheaper than buying a whole sheet, which you may not need all of it for a long time.
The frame material is 11 gauge, which is .119".  I had a buddy of mine, who will be known as Mr. X, bend this in the press brake at his place of employment.  
We trade favors, he bends metal for me and I give him fashion and dating advice.........because of my background as a Chippendale's dancer.


We ended up with a 3/16" radius, which is pretty close to the stock frame.
So, I grabbed the sawmill and the high speed and started hacking.
Clamped up and ready to start tack welding.
The completed section after primering.  

The next area has some weird damage.  It looks like maybe this frame was picked up with a hay spear.  If you have no idea what a hay spear is, it is the most universally misused tool on a farm.

Same basic process here, just in a smaller area.  I straightened up the remainder of the dented area and welded the patch in.  It was pretty quick and painless.
Good as new.  That's all for this weekend.  I need to focus on getting the rear spring hangers installed next.

Shiny, Pretty things dangling from the ceiling .....

Sometimes, I just have to paint stuff to make myself feel like I am making progress.  Visual progress.  I need visual progress.

 So, I gathered up the pieces I had that I can paint that bolt onto the chassis.  It's easier to paint things individually, rather than when I am trying to paint the frame as a complete unit. 

I tried something that I thought would look good.  I had drilled my front axle and polished the web to a high luster.  I thought it would be cool to paint the axle black with the web painted ivory to match the accent color.  Boy was I wrong. Tragically wrong.
I primered the axle and back taped the areas I wanted in the ivory color.  It ended up looking like something from a 1950's western.
So, after conferring with a couple of my hot rod buddies that are always brutally honest, I decided to abort the whole idea.  Black is always safe.
Mucho better.

I painted the wheels in the polyurethane paint, JetGlo.  This paint is primarily used for aircraft base colors.  This is the accent color that I will be using to offset the body color.

THE OLD DOUBLE CROSS.....MEMBER

It's been a few months since I have posted.  A lot of stuff going on with work and life just getting in the way.  I recently, took some time off around the holidays and decided to get back on the old shop truck.
I finished up the boxing plate project on the rear kick up area.
Then I focused on the thing I have been putting off, the center cross member.  Most of what I will do on this blog are just over the counter part changes.  Nothing revolutionary.  I bought the Chassis Engineering X member kit with the split wishbone option and the tranny mount built into the center plate.

The kit requires removing the original rivets that hold the center cross member in.  This is a pretty labor intensive process.  It takes the better part of an afternoon.
The carnage from an afternoon's worth of work.
This build has actually been kind of refreshing.  A lot of the stuff I build starts out to be a driver, but ends up being too nice to enjoy, so I end up selling it.  Then the process starts all over again, it's a sickness.
  This one is different, it takes me back to my early years of building hot rods, before I had a real job.  Back before everyone had professionals building the average street rod or hot rod.  Guys built their own hot rods in their garage and they were driven.....a lot.
 This is going to be a safe, reliable driver on a micro budget.  Most of the parts I already had, due to nearly 3 decades of swap meet scouring.